
Go Unlimited with Magzter GOLD
Get unlimited access to 10,000+ magazines, newspapers and Premium stories for just
Try GOLD - Free
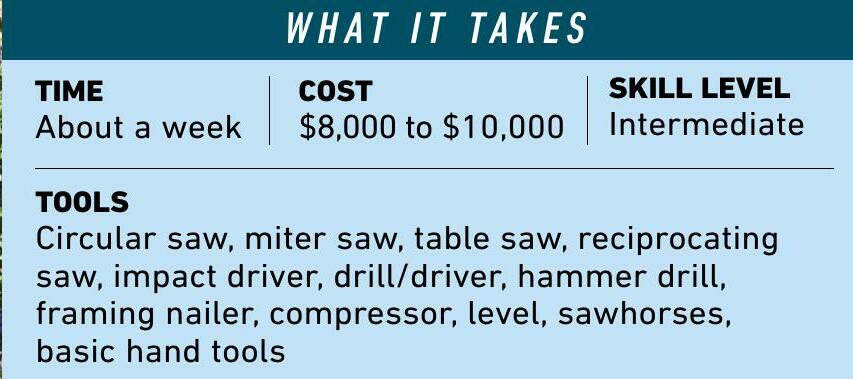
BUILD A GREENHOUSE EXTEND YOUR GROWING SEASON BY MONTHS!
Family Handyman
|September 2022
Here in the Upper Midwest, the gardening season is short, typically May through September. By building a greenhouse, H we can harness the sun's rays to let plants thrive as early as March and extend harvest into late fall. A greenhouse is also a great place to store less hardy plants during harsh winters. Even if you live in a more temperate region, a greenhouse will create a perfect climate for plants, protecting them from temperature swings, storms and pests. We built our greenhouse from cedar, which weathers beautifully, and polycarbonate sheets, which diffuse the sunlight and give even exposure to all the plants.

MEET THE BUILDER
MIKE BERNER ENJOYS WRAPPING HIS HEAD AROUND PROJECTS OF ALL SIZES AND HELPING PEOPLE BUILD COOL STUFF.
1 BUILD THE FOUNDATION
We removed 8 in. of topsoil to make room for our base layer of rock. We leveled and compacted the dirt, rolled out heavy-duty landscape fabric, then added at least a 2-in. layer of 3/4-in. limestone. Next we created a mini retaining wall using landscaping timbers. We placed, leveled and squared three sides of the retaining wall, leaving the fourth side off until most of the rock was dumped.

We secured the timbers at the corners with 8-in. timber screws and fastened a pressure-treated board to keep the timbers together at the seams. When most of the rock was dumped and evenly spread, we built the fourth side. Then we leveled off and compacted the rock with a tamper.

2 BUILD THE SIDE AND BACK WALLS
To build the walls, we used pressure-treated 2x4s for bottom plates and cedar 2x4s for top plates. We cut them to the length of each wall and marked the stud layout on them. Because the studs will be visible inside and outside, we wanted the walls to be symmetrical, so we found the center of the wall and marked the studs every 16 in. on-center from there. We nailed the cedar 2x4 studs through the plates and then fastened a second bottom plate. After tipping up each wall, we kept it plumb with braces at each corner and nailed the corners together, making sure the top plates were flush on top.

This story is from the September 2022 edition of Family Handyman.
Subscribe to Magzter GOLD to access thousands of curated premium stories, and 10,000+ magazines and newspapers.
Already a subscriber? Sign In
MORE STORIES FROM Family Handyman

Family Handyman
Smart Kitchen Swaps
From brewing morning coffee to cleaning up after dinner, everyday tasks become top-tier experiences with these little luxuries
6 mins
October/ November 2025

Family Handyman
Rules of the Roof
An experienced roofer shares industry secrets for seasonal maintenance, DIY repairs and more
3 mins
October/ November 2025
Family Handyman
Turn Up the Heat
The best patio heaters balance warmth with style and safety. Here's how to choose the right one for your space.
1 mins
October/ November 2025

Family Handyman
Kids Art Frame
Show off their latest masterpiece and tuck the rest away for safekeeping
3 mins
October/ November 2025

Family Handyman
Bathroom Storage Slip-Ups
These common items don't belong in a hot and humid bathroom. Clear them out to protect your belongings and make room for all the essentials.
1 mins
October/ November 2025

Family Handyman
Demo-Free Bathroom Upgrades
A few clever changes, a deep clean and the right accessories are all it takes to make your bathroom feel brand-new
1 mins
October/ November 2025

Family Handyman
Install a Towel Bar
Without proper anchoring, towel bars can loosen and fall. Follow these steps for a secure, long-lasting installation.
2 mins
October/ November 2025

Family Handyman
3D Plaster Panels
Harness the power of optical illusion to transform a flat wall into a sculptural statement
3 mins
October/ November 2025

Family Handyman
Vinyl Revival
When it comes to vinyl flooring, planks are just the beginning. If tile is more your style, start here to get inspired.
1 min
October/ November 2025

Family Handyman
HOW TO INSTALL A Transition Strip
Cap off your new flooring with a strip that blends in seamlessly and doesn't steal the spotlight
3 mins
October/ November 2025
Translate
Change font size