
Go Unlimited with Magzter GOLD
Get unlimited access to 10,000+ magazines, newspapers and Premium stories for just
3D Plaster Panels
Family Handyman
|October/ November 2025
Harness the power of optical illusion to transform a flat wall into a sculptural statement
With a background in decorative finishes and textures, I’ve always been drawn to projects that feel like sleight of hand—using affordable materials and simple techniques to create dramatic, professional-looking results. These textured wall art panels fit the bill perfectly. They may look carved and weighty, but they’re made with lightweight fiberglass window screen, plaster bandages and a little creativity. So gather your tools and materials and make a bit of wall magic.
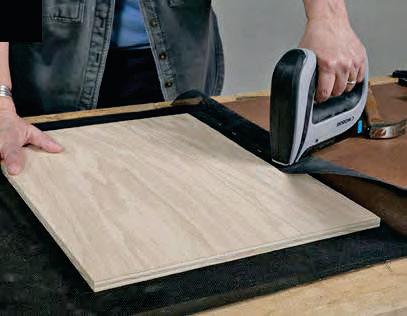
1 CUT THE SCREEN
Measure the ½-in. plywood backing board, then cut the fiberglass window screen 8 in. larger in both directions (to allow for a 4-in. overhang on all sides). You can trim it later if needed, but it’s best to start with extra material.
2 STAPLE THE SCREEN TO THE BACK OF THE BOARD
Working from the back, staple the screen 1 in. from the edge along one side of the board using ¼-in. staples spaced roughly 2 in. apart.
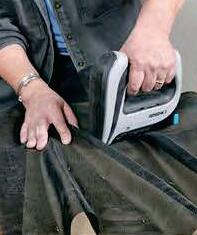 3 CREATE THE FOLDS
With the backing board facing up, staple the screen in place along the front of the same side you stapled in Step 2. Next, adjust the slack in the screen to begin creating folds and undulations. When you find a placement you like, staple the screen in place. If you are not satisfied with where it lands, remove the staple, adjust the screen and restaple it.
This story is from the October/ November 2025 edition of Family Handyman.
Subscribe to Magzter GOLD to access thousands of curated premium stories, and 10,000+ magazines and newspapers.
Already a subscriber? Sign In
MORE STORIES FROM Family Handyman

Family Handyman
Desktop Cord Organizer
Keep your devices charged and messy cords out of sight with this clever DIY box
3 mins
December 2025 / January 2026
Family Handyman
Custom Closet Storage
Turn any closet into a clutter-free zone with this easy organizer you can build in a day
3 mins
December 2025 / January 2026
Family Handyman
Entryway Storage
Keep on-the-go gear organized with a functional statement piece for your hallway, foyer or mudroom
8 mins
December 2025 / January 2026

Family Handyman
Lazy Susan
This rotating tray fit for a feast displays your craftsmanship from all angles
4 mins
December 2025 / January 2026

Family Handyman
Handy Hints
An organized workshop makes every project run smoother. Check out these smart solutions for taming clutter.
1 mins
December 2025 / January 2026

Family Handyman
New Year, New Gym
Kick off 2026 with a home workout space that energizes and inspires you. Start here for an easy DIY to keep your gear organized, then explore ideas for quick upgrades that refresh the room.
3 mins
December 2025 / January 2026

Family Handyman
DIY Kegerator
Keep the cheer flowing with frosty pours on demand
5 mins
December 2025 / January 2026

Family Handyman
Keep Your Kitchen Flowing
The sink, garbage disposal and dishwasher are interconnected. Use these tips and simple fixes to stop slowdowns.
6 mins
December 2025 / January 2026

Family Handyman
The Art of What's Left Behind
In a country that trashes more than 12 million tons of furniture every year, one resourceful woodworker is proving there's beauty—and a business—in the scraps
3 mins
December 2025 / January 2026
Family Handyman
Great Goofs
DIY projects don't always go as planned. These readers learned the hard way!
1 min
December 2025 / January 2026
Listen
Translate
Change font size