Denemek ALTIN - Özgür
STORAGE SHELF
The Home Handyman
|September/October 2023
This DIY drawer is really simple to make! I take you step by step showing how I made this storage shelf. It also makes a great DIY monitor stand too!
-

Step-by-step guide
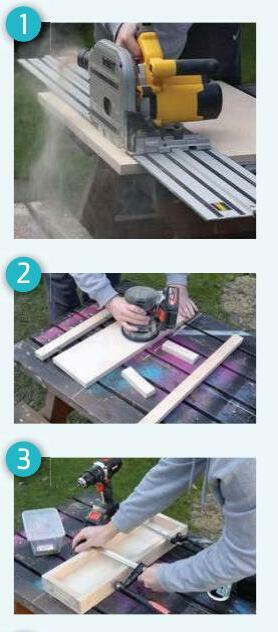
Step 1: Make the drawer
The first step in this project is to cut the 18mm plywood pieces to size. You can of course adapt the sizes to best suite your needs but I will list the sizes I went with as the project progresses.
I cut two strips at 35mm wide, one at 150mm wide and another at 200mm wide. These will for the body to the drawer along with the top to the shelf. Off cuts will be used to make the drawer front later.
Using the mitre saw I cut the pieces to length. I cut the drawer bottom to 500mm long, the front and back sides to the drawers were also cut to 500mm long and the two short sides to the drawers were cut at 114mm long. I also cut the top shelf to 650mm long.
I find it better to offer up the pieces and mark them exactly rather than measuring. In this instance, I cut the drawer bottom to size and then offered up the side pieces and marked them flush. I find this method much more accurate.
At this stage, with the pieces all cut, it's easier to sand the inside faces smooth before assembling the drawer. I sanded the inside faces to 240 grit.
Then it was time for assembly. To make things easier I used some clamps to the hold the side pieces together while I drilled pilot holes at the corners. I could them add wood glue to the joints and secure the sides back together with screws. To attach the bottom in place I first added a bead of wood glue around the edges, added the bottom piece and drilled pilot holes. I also countersunk the holes so the screws would sit below the surface. With the screws in place, the drawer can be put to one side to dry.

Bu hikaye The Home Handyman dergisinin September/October 2023 baskısından alınmıştır.
Binlerce özenle seçilmiş premium hikayeye ve 9.000'den fazla dergi ve gazeteye erişmek için Magzter GOLD'a abone olun.
Zaten abone misiniz? Oturum aç
The Home Handyman'den DAHA FAZLA HİKAYE

The Home Handyman
LIGHT UP YOUR PATH
A well-lit pathway isn't just about aesthetics, it's about safety, security, and welcoming guests to your home.
2 mins
January/February 2026

The Home Handyman
ROUTINE CARE FOR AIR CONDITIONERS
During the summer, the ideal room temperature is between 22 and 26°C.
4 mins
January/February 2026

The Home Handyman
HOW TO ARC WELD
A step-by-step guide (for beginners).
3 mins
January/February 2026

The Home Handyman
HOMEOWNERS URGED TO BUILD SMART
Home renovations, solar installations, and water-saving projects are on the rise. However, the MBAWC warns that homeowners who enter building agreements without fully understanding both their and the appointed contractor's rights, responsibilities, or the importance of clear contracts and insurance, risk costly disputes. Highlighting the scale of the problem, Sihle Zikalala, Deputy Minister of Public Works and Infrastructure, noted at the 2025 International Construction Law Association Conference that South Africa is spending considerable amounts of money due to disputes within the construction sector.
4 mins
January/February 2026

The Home Handyman
HEAVY-DUTY SECURITY GATE
By now, your gate posts are solidly set in concrete, and your rectangular frame is cut, tacked, and checked for alignment.
5 mins
January/February 2026

The Home Handyman
UNDERSTANDING CORDLESS DRILL TORQUE SETTINGS
Acordless drill is one of the most versatile tools in any DIYer's toolbox. It drills holes, drives screws, mixes paint, stirs mortar, tightens bolts and even sands with the right attachment. But many homeowners still feel confused by one particular feature: torque settings.
5 mins
January/February 2026

The Home Handyman
HOW TO CHOOSE THE PERFECT BUILT-IN BRAAI
A builtin braai is more than just a cooking appliance, it's a lifestyle statement. Whether you're hosting a Saturday rugby braai, a relaxed Sunday potjie, or a festive family gathering, the right builtin braai becomes the heart of your entertainment area. With so many options available in South Africa, choosing the right one can feel overwhelming, but with a little guidance you can confidently select a braai that suits your home, your cooking style, and the local climate.
3 mins
January/February 2026

The Home Handyman
YOUR SUMMER-TO-AUTUMN GARDEN GUIDE
The first three months of the year bring long days, warm evenings and a rhythm of rain, humidity and occasional heatwaves. It is a rewarding time for gardeners: vegetables grow fast, flowers burst with colour and there is still plenty of time to enjoy the outdoors before the crispness of autumn arrives.
3 mins
January/February 2026

The Home Handyman
THE PERFECT BRAAI AREA
Few things in life bring South Africans together quite like a braai. Whether it's a quick weekday chop, a Saturday rugby get-together, or a full weekend kuier, the braai area is where stories are shared, meals are made and memories live.
3 mins
January/February 2026

The Home Handyman
CHECK YOUR VEHICLE'S BRAKE PADS AND PARKING BRAKE
Your vehicle's brakes are some of the most hardworking safety components on the road. They operate every time you stop at a traffic light, slow down at an intersection or descend a steep hill. Yet many drivers only think about their brakes when something goes wrong. Regularly checking your brake pads and parking brake doesn't just keep you safe, it can save you money by catching wear before it becomes a major repair.
4 mins
January/February 2026
Translate
Change font size