
Magzter GOLD ile Sınırsız Olun
Sadece 9.000'den fazla dergi, gazete ve Premium hikayeye sınırsız erişim elde edin
LEARN TO ISOLATE BACKGROUNDS WITH THE DEPTH MAP IN DAVINCI RESOLVE
3D World UK
|October 2023
Natalie Barnard introduces her workflow for creating powerful colour corrections

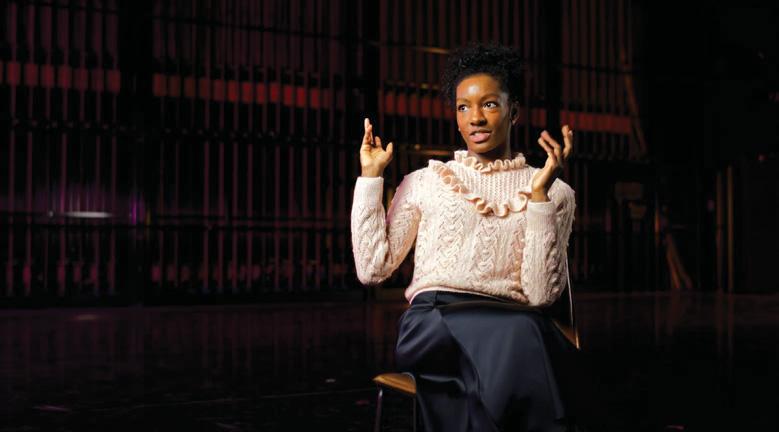
Depth Map is a powerful tool used for isolating parts of your image based on their distance from the camera. It's a great alternative to hand-drawn windows or Magic Masks, and is all thanks to DaVinci Resolve's neural engine.
In this first tutorial of our two-part exercise, we'll use Depth Map to apply colour corrections to the background of an interview shot. Make sure you check back next issue for our second workshop, when we'll build on the work we've done here by using Resolve 18.5's brand new Relight effect to add three-dimensionally accurate virtual lighting on the interviewee, which matches the new colour of the background we're creating here.
If you would like to follow along with this exercise as we go, the media that we're using is freely available for download at filmeditingpro.com/freefootage.
01 CHOOSE THE RIGHT TOOL
Before starting off, consider whether the shot will work well with the Depth Map effect. If the scene is cluttered or the subject is moving, then other Neural Engine tools such as the Magic Mask might be more suitable.
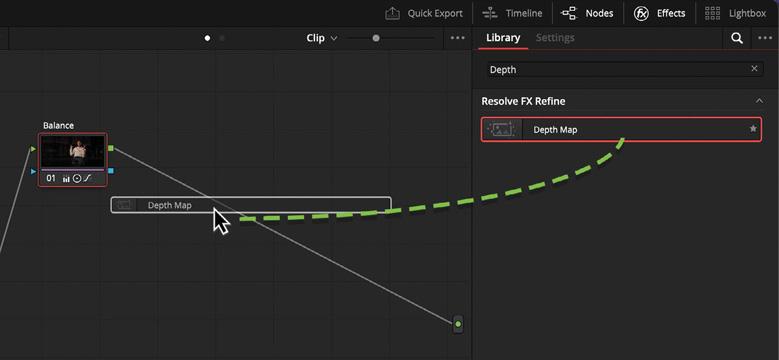
02 FIND THE DEPTH MAP EFFECT
Add the Depth Map Open FX effect to your node tree, which you'll find in the Effects tab. You can apply it to an existing node by double-clicking, or create a new node by dragging it into your node tree. If you drop the effect on an existing connection in your node tree, Resolve will automatically connect it.
Bu hikaye 3D World UK dergisinin October 2023 baskısından alınmıştır.
Binlerce özenle seçilmiş premium hikayeye ve 9.000'den fazla dergi ve gazeteye erişmek için Magzter GOLD'a abone olun.
Zaten abone misiniz? Oturum aç
3D World UK'den DAHA FAZLA HİKAYE

3D World UK
Nvidia GeForce RTX 4080 Super Founders Edition
On the surface, the GeForce RTX 4080 Super is barely any different from the vanilla GeForce RTX 4080 that was launched in 2022.
1 mins
December 2024

3D World UK
MCU VFX moments
Pros choose their favourite CG shots from the Marvel Cinematic Universe
4 mins
December 2024

3D World UK
Nosing around on Fallout
We sniff out the story of how FutureWorks brought The Ghoul to life with the creation of his iconic noseless face
4 mins
December 2024

3D World UK
DISCOVER RED GIANT GEO'S HANDY TOOLS
Heather Sterland introduces one of the newest additions to Maxon's suite of Red Giant VFX plugins with an atmospheric lunar creation
4 mins
December 2024

3D World UK
BUILD AND ANIMATE A FUN-FILLED ROBOT
Expand your horizons with Julio Benavides, who reveals his workflow for creating a charming hard-surface character
4 mins
December 2024

3D World UK
DESIGN STRIKING SCULPTS AT SPEED
Learn how to build 3D characters that balance visual quality and efficient workflow with pro advice from Oh Holy Mary
4 mins
December 2024

3D World UK
CREATE A CANYON ENVIRONMENT
Build a stunning desert setting with an expert walkthrough from Romain Eboli, who uses high-quality Quixel assets
4 mins
December 2024

3D World UK
TURN A 2D CONCEPT INTO AN INCREDIBLE 3D-PRINTED FIGURE
Concept artist Emily Chapman shares her process for sculpting, printing and painting an outstanding model to put on display
8 mins
December 2024

3D World UK
Goodbye SAIGON
Trevor Hogg gets held captive by multiple versions of Robert Downey Jr.while uncovering the visual effects of HBO's spy series The Sympathizer
5 mins
December 2024

3D World UK
IMPRESSIONISTIC REALISM
Trevor Hogg learns how the artisan aesthetic came to be for The Wild Robot
6 mins
December 2024
Translate
Change font size