Poging GOUD - Vrij
ADD COLOUR WITH TRADITIONAL FEEL
ImagineFX
|September 2025
Follow along as Eliza Ivanova explains her process for colouring artwork digitally without losing that innate sketchbook charm
-
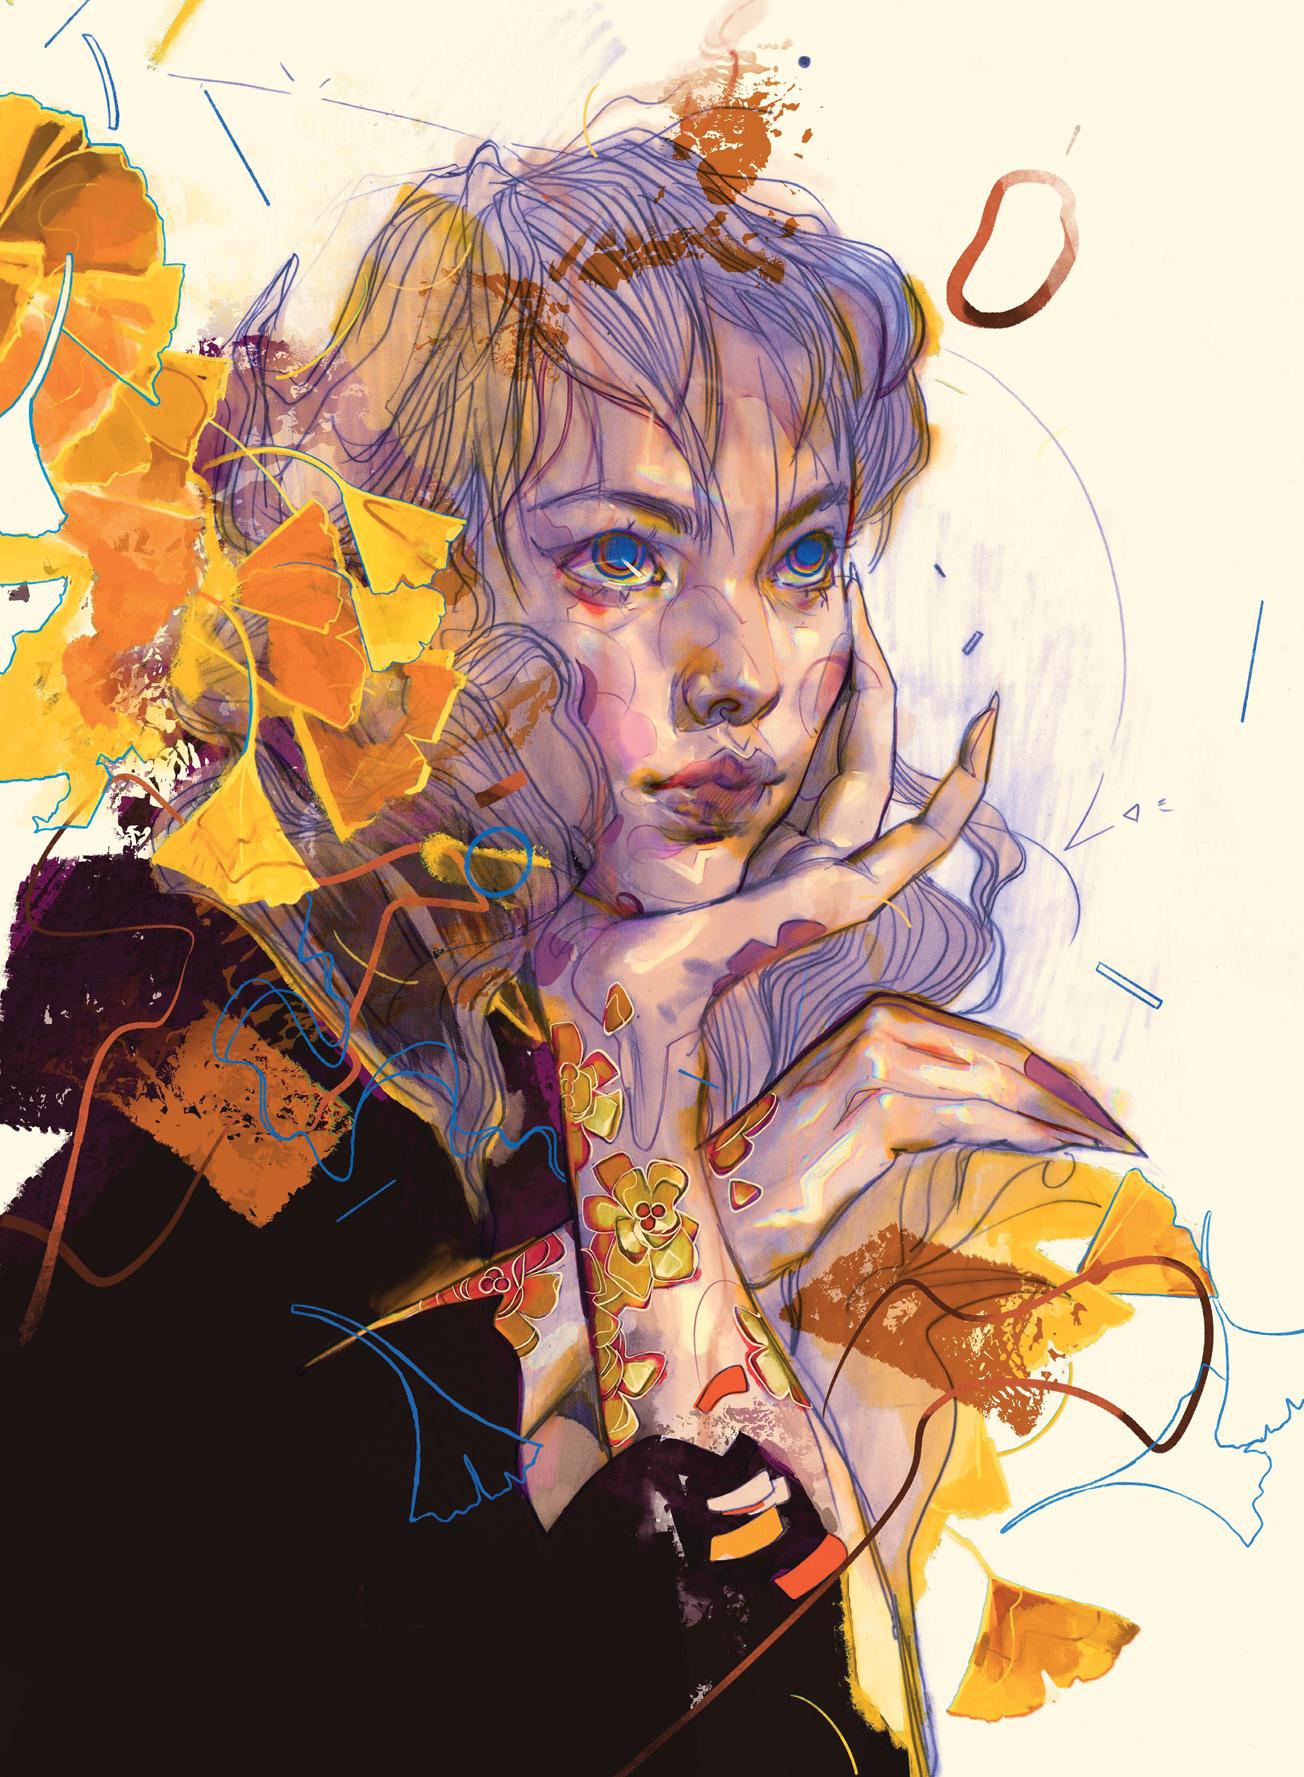
It's not uncommon to see a beautiful pencil or ink drawing that's been butchered under multiple layers of poorly constructed digital colouring.
Textured brushes are designed to replicate real-life brush, pencil or ink marks, so why not utilise the power of those real marks that have already been laid down on the paper? In this tutorial, you'll be able to follow along with my colouring process, see which brushes I use to mimic my drawing and shading, and learn how to maintain valuable information such as line quality, shading, textures, and imperfections - while elevating your piece digitally.
It's important to keep in mind that your basic setup is key to line up for success from the beginning; the things I look out for are scanning resolution (I use 600DPI or more), and selecting brush packs that contain brushes close to the ones used in the original piece. However, there are plenty of default brushes already available in Procreate that work wonderfully, especially the pencil and ink ones.
I also include brushes to simulate colour splotches and bleeds, and always test out my blending brush for texture as close to a real blending stump as possible. If your digital blending appears too smooth, it can overpower any nearby textures and sticks out as a mistake.
1. Separate the original scan into multiple layers
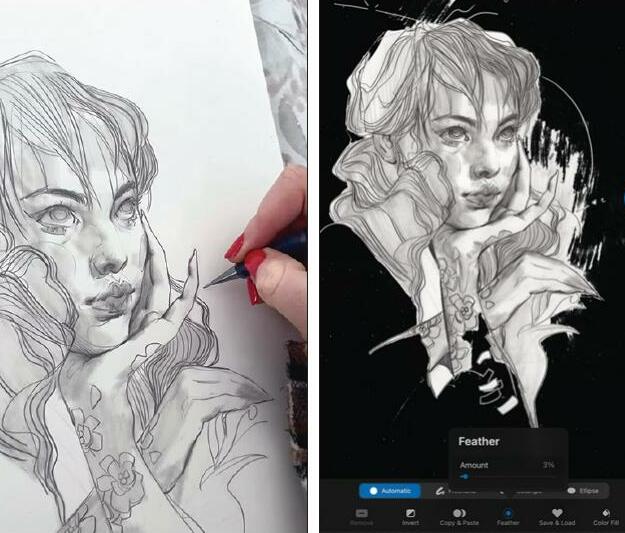 The first thing we'll need to do is set up our scanned drawing ready to be worked with digitally. Split it into at least two layers, most importantly the subject layer and a background layer. If the subject is pretty well contoured but there are additional elements of shading outside the subject lines, include those in the subject layer. To avoid harsh edges while separating the image into layers, use the Feather option at 2-3% to soften the selection's edges, then Cut and Paste.
Dit verhaal komt uit de September 2025-editie van ImagineFX.
Abonneer u op Magzter GOLD voor toegang tot duizenden zorgvuldig samengestelde premiumverhalen en meer dan 9000 tijdschriften en kranten.
Bent u al abonnee? Aanmelden
MEER VERHALEN VAN ImagineFX

ImagineFX
HP Omnibook X Flip 16
DOUBLING UP HP's latest Omnibook 2-in-1 is a decent-enough productivity laptop, but it truly shines when it's transformed into tablet mode
2 mins
February 2026

ImagineFX
Phaya Akat - The Sanctuary
“Phaya Akat’s Sanctuary Village began from a simple idea inspired by Thailand’s tradition of boiling eggs in natural hot springs.
1 min
February 2026

ImagineFX
HOW SURFACE NORMALS IMPROVE YOUR 3D ART
Ant Ward explains how to quickly change the way a polygon model looks by adjusting its normals
1 mins
February 2026

ImagineFX
Painting in Procreate: Reimagine Your Surroundings
VISIONARY WORK Across 20 lessons, Mikko Eerola reveals how he brings his ideas to life on the iPad using Procreate
1 mins
February 2026

ImagineFX
Technique focus: WORK SMARTER WITH COLOURS
Álvaro Jiménez reveals the workflow process he follows to summon an armoured demon
1 mins
February 2026

ImagineFX
FIVE MINUTES WITH PAT IMRIE
Big-screen blockbusters and a certain 3D art magazine helped set this creative on his career path
3 mins
February 2026

ImagineFX
RIFF ON YOUR PASSIONS
Max Froer draws on a range of influences when rendering a beast that's part machine
1 min
February 2026

ImagineFX
Anker SOLIX C1000
BOX OF DELIGHTS The chonkiest power bank around is powerful, portable (after a fashion) and boy is it well built
2 mins
February 2026

ImagineFX
PAINTING A SCENE OF GREEK DRAMA
Alexander Leskinen creates a stormy environment featuring harpies, the winged messengers of Zeus.
3 mins
February 2026

ImagineFX
HOW DO I COLOUR A 3D OBJECT?
The process of colouring a 3D image has a lot of layers, so let's start at the surface. Mike Griggs weighs up the material requirements
2 mins
February 2026
Listen
Translate
Change font size