Poging GOUD - Vrij
Build A Welding Table
The Family Handyman
|May 2018
Admit it: You’ve always wanted to learn how to weld. This pro will show you how.

Welding intimidates a lot of people, even some of us hardcore DIYers. And that’s a shame because welding opens up a whole new world of household repairs and cool projects. We asked a pro welder to demonstrate some basic techniques by building a welding table. She’ll walk you through each step and provide helpful tips along the way.
A metal welding table is the perfect project to start with because you can build all your future welding projects on it. The materials will cost about $160.
This table was built using a Lincoln 210MP. This machine can function as a MIG (metal inert gas/wire feed) welder, a TIG (tungsten inert gas) welder and a stick welder, but we used the MIG wire-feed function. To learn more about the equipment needed to get started in welding, including advice on how to choose a machine, check out our March ‘18 issue, p. 16.
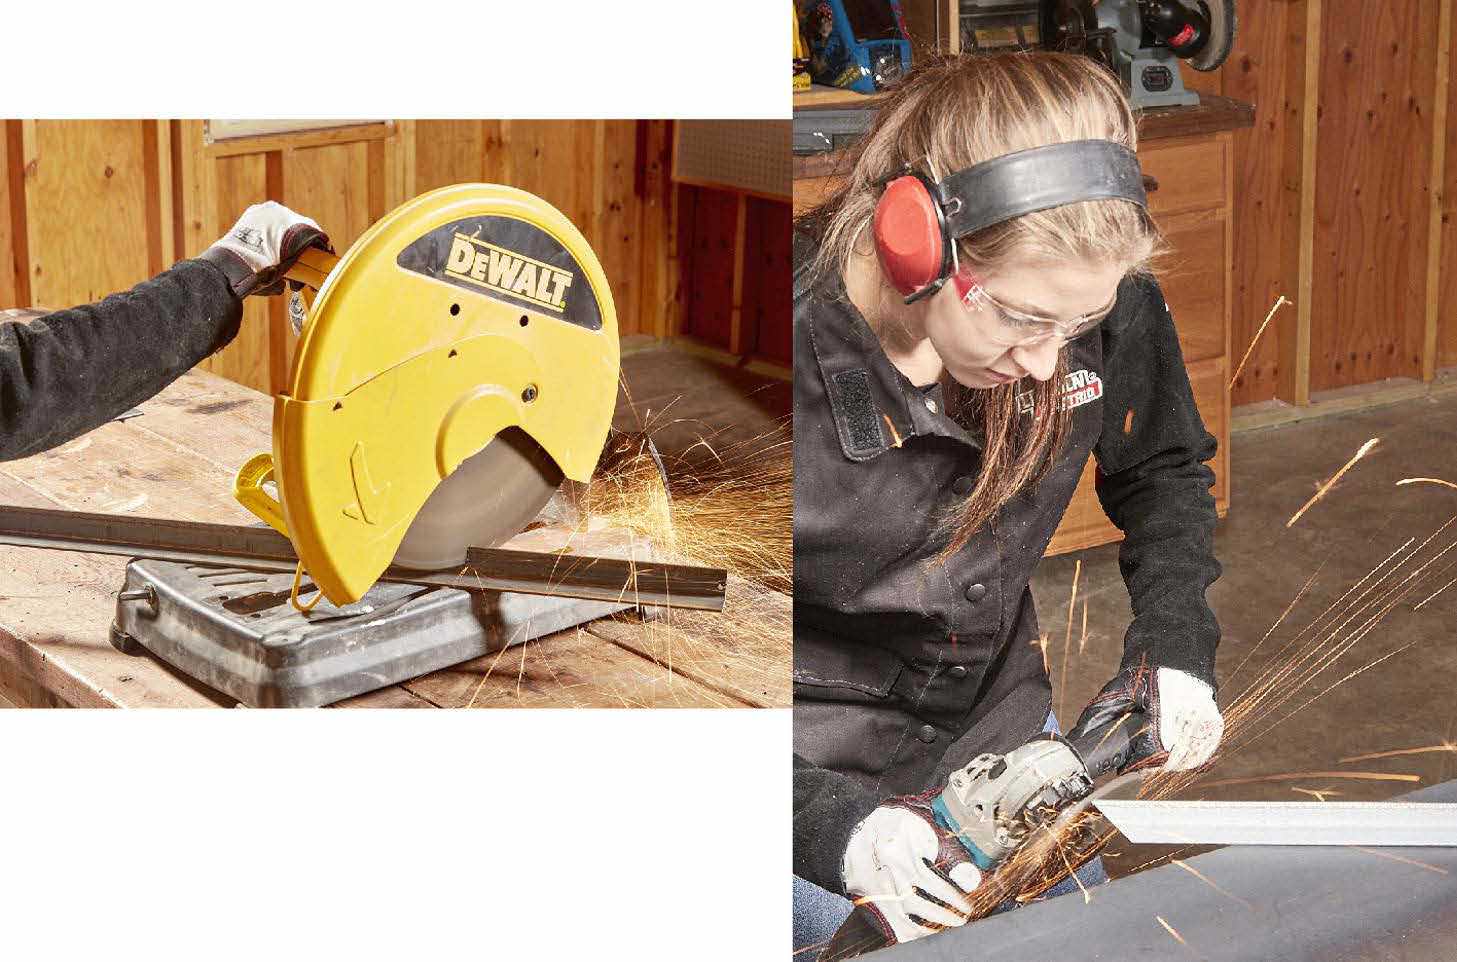
1. CUT METAL WITH A CHOP SAW
Fourteen-inch metal-cutting saws like this, outfitted with an abrasive blade, cost $100 to $200. These saws can cut bricks and pavers as well. A large metal-cutting saw with carbide teeth cuts metal like butter and with less burrs, but it will set you back more than $250. Never put a carbide-tooth blade on an abrasive saw because this saw runs at twice the rpm, a speed that could destroy the blade or worse. Miter saws designed to cut wood also spin too fast for metal-cutting blades, and since their motors aren’t sealed, the metal chips and shavings can destroy the motor.
Dit verhaal komt uit de May 2018-editie van The Family Handyman.
Abonneer u op Magzter GOLD voor toegang tot duizenden zorgvuldig samengestelde premiumverhalen en meer dan 9000 tijdschriften en kranten.
Bent u al abonnee? Aanmelden
MEER VERHALEN VAN The Family Handyman

Family Handyman
Desktop Cord Organizer
Keep your devices charged and messy cords out of sight with this clever DIY box
3 mins
December 2025 / January 2026
Family Handyman
Custom Closet Storage
Turn any closet into a clutter-free zone with this easy organizer you can build in a day
3 mins
December 2025 / January 2026
Family Handyman
Entryway Storage
Keep on-the-go gear organized with a functional statement piece for your hallway, foyer or mudroom
8 mins
December 2025 / January 2026

Family Handyman
Lazy Susan
This rotating tray fit for a feast displays your craftsmanship from all angles
4 mins
December 2025 / January 2026

Family Handyman
Handy Hints
An organized workshop makes every project run smoother. Check out these smart solutions for taming clutter.
1 mins
December 2025 / January 2026

Family Handyman
New Year, New Gym
Kick off 2026 with a home workout space that energizes and inspires you. Start here for an easy DIY to keep your gear organized, then explore ideas for quick upgrades that refresh the room.
3 mins
December 2025 / January 2026

Family Handyman
DIY Kegerator
Keep the cheer flowing with frosty pours on demand
5 mins
December 2025 / January 2026

Family Handyman
Keep Your Kitchen Flowing
The sink, garbage disposal and dishwasher are interconnected. Use these tips and simple fixes to stop slowdowns.
6 mins
December 2025 / January 2026

Family Handyman
The Art of What's Left Behind
In a country that trashes more than 12 million tons of furniture every year, one resourceful woodworker is proving there's beauty—and a business—in the scraps
3 mins
December 2025 / January 2026
Family Handyman
Great Goofs
DIY projects don't always go as planned. These readers learned the hard way!
1 min
December 2025 / January 2026
Translate
Change font size