استمتع بـUnlimited مع Magzter GOLD
احصل على وصول غير محدود إلى أكثر من 9000 مجلة وصحيفة وقصة مميزة مقابل
CREATE ABSTRACT SIMULATIONS USING BIFROST FLUIDS
Christmas 2020
|3D World UK
Holly Watt demonstrates how to set up and manipulate liquid simulations in Maya


Bifrost Fluids is known for its capability to recreate real-world liquid simulations such as oceans, but it can also be a useful tool in creating abstract fluid simulations. The added bonus is that it is a free plug-in with Autodesk Maya, so there is no need to leave the Maya software in order to create these types of fluid simulations. This tutorial covers the process of setting up and manipulating Bifrost Fluids that morph from one shape mesh to another, giving a zero-gravity effect. An overview is given on how to set up the initial Bifrost Fluid simulation, tweak the liquid properties, caching and finally rendering.
Motion Fields in Bifrost Fluids have the ability to control the particles’ movements and velocities, and this tutorial uses the Along Normal attribute to conform the particles to the shape of a mesh. We will cover how to add a Motion Field and how to use it to manipulate particles to morph between two meshes. With this knowledge you will also be able to apply the Along Normal attribute to achieve other effects, such as using geometry to control the directional movement of a liquid or to have liquid return to its original form after a collider has passed through it.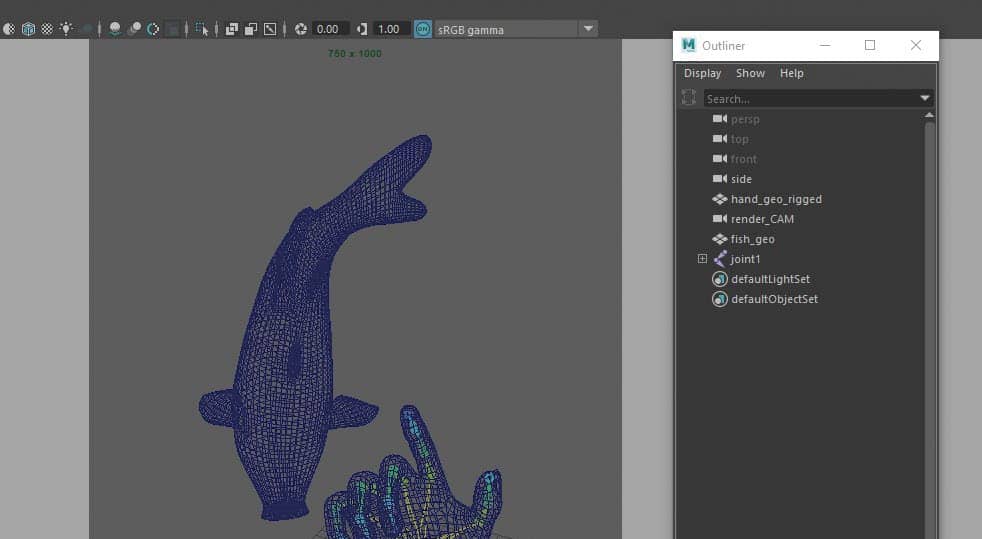
01 SET UP THE SCENE
هذه القصة من طبعة Christmas 2020 من 3D World UK.
اشترك في Magzter GOLD للوصول إلى آلاف القصص المتميزة المنسقة، وأكثر من 9000 مجلة وصحيفة.
هل أنت مشترك بالفعل؟ تسجيل الدخول
المزيد من القصص من 3D World UK

3D World UK
Nvidia GeForce RTX 4080 Super Founders Edition
On the surface, the GeForce RTX 4080 Super is barely any different from the vanilla GeForce RTX 4080 that was launched in 2022.
1 mins
December 2024

3D World UK
MCU VFX moments
Pros choose their favourite CG shots from the Marvel Cinematic Universe
4 mins
December 2024

3D World UK
Nosing around on Fallout
We sniff out the story of how FutureWorks brought The Ghoul to life with the creation of his iconic noseless face
4 mins
December 2024

3D World UK
DISCOVER RED GIANT GEO'S HANDY TOOLS
Heather Sterland introduces one of the newest additions to Maxon's suite of Red Giant VFX plugins with an atmospheric lunar creation
4 mins
December 2024

3D World UK
BUILD AND ANIMATE A FUN-FILLED ROBOT
Expand your horizons with Julio Benavides, who reveals his workflow for creating a charming hard-surface character
4 mins
December 2024

3D World UK
DESIGN STRIKING SCULPTS AT SPEED
Learn how to build 3D characters that balance visual quality and efficient workflow with pro advice from Oh Holy Mary
4 mins
December 2024

3D World UK
CREATE A CANYON ENVIRONMENT
Build a stunning desert setting with an expert walkthrough from Romain Eboli, who uses high-quality Quixel assets
4 mins
December 2024

3D World UK
TURN A 2D CONCEPT INTO AN INCREDIBLE 3D-PRINTED FIGURE
Concept artist Emily Chapman shares her process for sculpting, printing and painting an outstanding model to put on display
8 mins
December 2024

3D World UK
Goodbye SAIGON
Trevor Hogg gets held captive by multiple versions of Robert Downey Jr.while uncovering the visual effects of HBO's spy series The Sympathizer
5 mins
December 2024

3D World UK
IMPRESSIONISTIC REALISM
Trevor Hogg learns how the artisan aesthetic came to be for The Wild Robot
6 mins
December 2024
Translate
Change font size