
Repairing tongue-and-groove floorboards is easy with the right tools and a little know-how. Many common problems can be fixed in a day to make your floor look like new again.
Over the years, I've seen my share of damaged hardwood floors. Sometimes the flaw can be repaired with wood putty and a quick touch-up-other times surgery is required. Here are some tips to help you repair your own flooring trouble spots.
1 TAPE THE BOUNDARY
Inspect the damaged flooring plank and decide how much length to remove. Stagger the ends of the repair about 5 in. from the butt joints of the adjacent floorboards. Place masking tape to define the boundary, using the replacement board as a guide.
2 DRILL RELIEF HOLES
Drill three 1/2-in. holes close each end of the board you're removing. Don't try to get the holes perfectly on the butt joint-about 1/8 in. away is fine.
3 CHISEL THE BUTT JOINT
With a sharp chisel, clean up between the holes and the end of the repair. First, make a vertical cut to cleanly sever the wood fibers, then come in at a slight angle to remove waste. Repeat this process until you reach the subfloor.
4 MAKE RELIEF CUTS
This story is from the October - November 2022 edition of Family Handyman.
Start your 7-day Magzter GOLD free trial to access thousands of curated premium stories, and 8,500+ magazines and newspapers.
Already a subscriber ? Sign In
This story is from the October - November 2022 edition of Family Handyman.
Start your 7-day Magzter GOLD free trial to access thousands of curated premium stories, and 8,500+ magazines and newspapers.
Already a subscriber? Sign In

7 Bicycle Maintenance Tips
Keep your bike in tiptop shape and ride safe!

SETTING FENCE POSTS WITH EXPANDING FOAM
Any fence builder knows you need strong posts for a strong fence, and that means backfilling the postholes with a dense, hard material other than dirt.
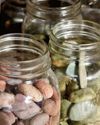
PEBBLE MOSAIC STEPPING STONES
COLLECT SOME RIVER ROCK AND MAKE YOUR OWN UNIQUE STEPPINGSTONE PATH

EARTH-FRIENDLY WEED KILLERS
HEALTHIER CHOICES FOR HUMANS AND THE ENVIRONMENT
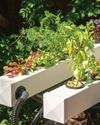
DIY! HYDROPONIC GARDEN
FRESH VEGETABLES AT YOUR FINGERTIPS

GROW MINI VEGETABLES
GROW A GARDEN IN A TINY SPACE!

BUILD A VERTICAL GARDEN
TIME TO GROW UP!
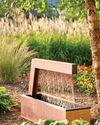
MODERN WATER FOUNTAINS
A SPLASH OF PEACE FOR YOUR PATIO
9 ALTERNATIVE USES FOR SAWDUST
Every fully stocked wood shop has a table saw. You can usually find a pile of sawdust under it, even if it's used only occasionally. If a shop has a belt sander or band saw, there's probably another pile of finer sawdust under that. Even people without stationary tools have sawdust accumulation on their workbenches.
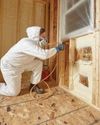
INSULATE WITH FOAM
IT'S A GREAT ALTERNATIVE TO FIBERGLASS