
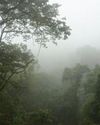
Local adjustments have long been one of the best features in Adobe’s Camera Raw and Lightroom programs. But now things have moved up a gear with Select Sky and Select Subject, two hugely helpful new masking tools that sit alongside the existing Adjustment Brush and Radial and Graduated Filters. These new tools let you automatically target areas with a single click, so you can add drama to a blown-out sky, lift the tones in your subject and make powerful local enhancements.
The improvements don’t end there. The brand-new Masking Panel changes the way local adjustments are organised and edited. The old system would give each new edit a simple pin, but now there’s a dedicated panel that makes a group from each mask. Crucially, this allows you to add or subtract from the initial mask using any of the other local tools. Then there are the Color Range and Luminance Range commands that let you single out specific colours or brightness.
If you’re accustomed to using local adjustments, this new modular approach will take some getting used to, but it ultimately gives you greater control.
Show overlay options
This story is from the January 2022 edition of Digital Camera World.
Start your 7-day Magzter GOLD free trial to access thousands of curated premium stories, and 8,500+ magazines and newspapers.
Already a subscriber ? Sign In
This story is from the January 2022 edition of Digital Camera World.
Start your 7-day Magzter GOLD free trial to access thousands of curated premium stories, and 8,500+ magazines and newspapers.
Already a subscriber? Sign In
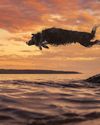
Jess McGovern
The multi-award winning photographer will speak twice at The Photography Show this month. Niall Hampton finds out what's in store...
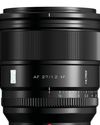
Viltrox AF 27mm F1.2 Pro
A ‘pro’ lens with a consumer price tag

Lumix S100mm f/2.8 Macro
Ticks many boxes but is not a total success

Canon RF 200-800mm F6.3-9 IS USM
Every so often, a new superzoom telephoto lens grabs our attention.

Hasselblad 907X & CFV 100C
Not just a beautiful camera system but versatile, too
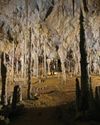
Sam Davis
The caving photographer will be shining a light on his passion at The Photography Show. Niall Hampton gets a deep dive into the subject

Explore the Multiply blending mode
Multiply is a versatile mode that can be used for a wide range of effects, either on its own or combined with other modes
Create a fine-art border in Lightroom
Enhance your landscape photos by adding a fine-art border with an even feathered edge
Content Credentials explained
Fight the fakes and prove your own photos are genuine with provenance tools in Photoshop and Lightroom
Scanning ahead...
With ever-higher sensor resolutions, Jon Devo asks whether zoom lenses have had their day