
Our garages are multitaskers. Vehicle storage, workshop, tool organizer and hangout space for friends and family. For this garage to serve all those purposes, it must be highly organized. I customized two typical kitchen cabinets for maximum storage. Think Swiss Army Knife caliber organization and convenience.
TALL CABINET
1 INSTALL SHELVES
Use a clamp to temporarily support the middle shelf (C) in its approximate location, and use the lower divider panel (B) as a support and spacer. Attach the shelf with pocket screws. After attaching one side of the shelf, slide the divider to the other side, remove the clamp and attach that side. You’ll repeat this process for the upper shelf (D) once the upper divider panel (A) is in place.
2 INSTALL THE DIVIDER PANELS
Using the upper shelf (D) as a spacer, attach the top and bottom of the lower panel. Repeat the process for the upper divider panel (A), then install the upper shelf. Use pocket screws for all these connections.
3 ASSEMBLE DRAWER BOXES
After completing the Cutting List, assemble the drawer boxes (N – W) using crown staples and wood glue. Do this on a flat table to ensure the parts stay flush on the bottom.
4 BUILD PEGBOARD PANELS
Make a pullout pegboard panel sandwich (J and K) using nails for the mitered corners of the frame (E – H), crown staples and construction adhesive for the panels.
5 INSTALL THE PULLOUT PANELS
This story is from the July - August 2021 edition of Family Handyman.
Start your 7-day Magzter GOLD free trial to access thousands of curated premium stories, and 8,500+ magazines and newspapers.
Already a subscriber ? Sign In
This story is from the July - August 2021 edition of Family Handyman.
Start your 7-day Magzter GOLD free trial to access thousands of curated premium stories, and 8,500+ magazines and newspapers.
Already a subscriber? Sign In

7 Bicycle Maintenance Tips
Keep your bike in tiptop shape and ride safe!

SETTING FENCE POSTS WITH EXPANDING FOAM
Any fence builder knows you need strong posts for a strong fence, and that means backfilling the postholes with a dense, hard material other than dirt.

PEBBLE MOSAIC STEPPING STONES
COLLECT SOME RIVER ROCK AND MAKE YOUR OWN UNIQUE STEPPINGSTONE PATH

EARTH-FRIENDLY WEED KILLERS
HEALTHIER CHOICES FOR HUMANS AND THE ENVIRONMENT
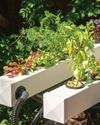
DIY! HYDROPONIC GARDEN
FRESH VEGETABLES AT YOUR FINGERTIPS

GROW MINI VEGETABLES
GROW A GARDEN IN A TINY SPACE!

BUILD A VERTICAL GARDEN
TIME TO GROW UP!
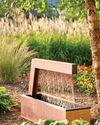
MODERN WATER FOUNTAINS
A SPLASH OF PEACE FOR YOUR PATIO

9 ALTERNATIVE USES FOR SAWDUST
Every fully stocked wood shop has a table saw. You can usually find a pile of sawdust under it, even if it's used only occasionally. If a shop has a belt sander or band saw, there's probably another pile of finer sawdust under that. Even people without stationary tools have sawdust accumulation on their workbenches.

INSULATE WITH FOAM
IT'S A GREAT ALTERNATIVE TO FIBERGLASS