
How many times have you picked up a battery-powered tool, only to find that it was put away with a dead battery? I came up with this sliding panel and drawer charging station built into a tall garage cabinet that lets me store everything in one place. With tools organized and easy to access, a bin for charged batteries, and a charger at the ready, you won’t be stuck waiting for a charge.
1 FRAME AROUND SLAT WALL PANELS
Cut the slat wall to size and attach a frame around it. The poplar frame stiffens the panel and hides the raw edges. I glued and nailed the frame parts to the edge of the panel, flush with the face, starting with the top and bottom. I cut the sides to fit and fastened them the same way.
PRO TIP
The slats in the panels I bought ran the long way, so I had to put two pieces together to make the panels tall enough. The frame held the edges together, and I added an extra batten on the back to support the seam.
2 BATTEN THE BACK
Glue and nail battens about 6 in. from the top and bottom of the panels. Both the frame and the battens stiffen the panels; the battens also give you something to screw drawer slides to.
3 MARK YOUR STORY STICK
I made a mark 2 in. from the top of the story stick and lined it up with the top of my panel. I made a mark for the centerline of the slides on the spacers and the story stick, then rotated the stick and marked the locations for the cabinet spacers.
MAKE A STORY STICK TO PLACE THE SLIDES
This story is from the July - August 2021 edition of Family Handyman.
Start your 7-day Magzter GOLD free trial to access thousands of curated premium stories, and 8,500+ magazines and newspapers.
Already a subscriber ? Sign In
This story is from the July - August 2021 edition of Family Handyman.
Start your 7-day Magzter GOLD free trial to access thousands of curated premium stories, and 8,500+ magazines and newspapers.
Already a subscriber? Sign In

7 Bicycle Maintenance Tips
Keep your bike in tiptop shape and ride safe!

SETTING FENCE POSTS WITH EXPANDING FOAM
Any fence builder knows you need strong posts for a strong fence, and that means backfilling the postholes with a dense, hard material other than dirt.

PEBBLE MOSAIC STEPPING STONES
COLLECT SOME RIVER ROCK AND MAKE YOUR OWN UNIQUE STEPPINGSTONE PATH

EARTH-FRIENDLY WEED KILLERS
HEALTHIER CHOICES FOR HUMANS AND THE ENVIRONMENT
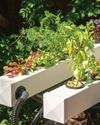
DIY! HYDROPONIC GARDEN
FRESH VEGETABLES AT YOUR FINGERTIPS

GROW MINI VEGETABLES
GROW A GARDEN IN A TINY SPACE!

BUILD A VERTICAL GARDEN
TIME TO GROW UP!
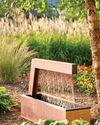
MODERN WATER FOUNTAINS
A SPLASH OF PEACE FOR YOUR PATIO

9 ALTERNATIVE USES FOR SAWDUST
Every fully stocked wood shop has a table saw. You can usually find a pile of sawdust under it, even if it's used only occasionally. If a shop has a belt sander or band saw, there's probably another pile of finer sawdust under that. Even people without stationary tools have sawdust accumulation on their workbenches.

INSULATE WITH FOAM
IT'S A GREAT ALTERNATIVE TO FIBERGLASS