
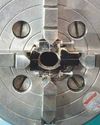
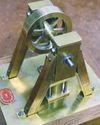
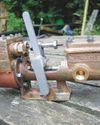
With most of the parts made by this stage, and the tender and belly tank painted, it was time to start the (hopefully) final assembly of the engine. At this stage in real time the engine was still on its trolley and the block and motion all pretty much complete after the engine had been test run on air. However, I had removed the crankshaft, painted the various parts and replaced it so the motion was still pretty much together. The front wheels, perch bracket and axle were also off the engine for painting. In addition, I needed to get the engine off the building trolley so I could finally fit the belly tank.
I had managed to fit the (unpainted) belly tank to the engine whilst it was on the build trolley and had followed this by the steering shaft, which was fitted to the belly tank by bolting it on as a second operation. However, I then could not remove the belly tank with the steering chain shaft fitted as there was insufficient clearance between engine and build trolley. As the belly tank was now fully assembled and painted with the steering gear in position I knew it would not go back on with the engine on the trolley. This could have been avoided but I was using an old trolley so I managed as best as I could. Photograph 547 shows the engine on the trolley before painting.
The rest of the engine was to be assembled in a semi preplanned order which meant that everything that had to go on before the wheels were finally fitted. It should be noted that I needed to put the rear wheels on to get the engine off the trolley but then had to remove the rear wheels again in order to finalise the brake gear and fix another problem which arose; of which more later.
The perch bracket with the newly painted front axle was the first to go on. This was preassembled and carefully slid into position and the perch bracket bolts fitted and secured, and the whole lot protected by some bubble wrap while I carried on.
This story is from the 4630 edition of Model Engineer.
Start your 7-day Magzter GOLD free trial to access thousands of curated premium stories, and 8,500+ magazines and newspapers.
Already a subscriber ? Sign In
This story is from the 4630 edition of Model Engineer.
Start your 7-day Magzter GOLD free trial to access thousands of curated premium stories, and 8,500+ magazines and newspapers.
Already a subscriber? Sign In
WORKSHOP TIP - Boring Eccentrics
I am making a 1 inch Minnie traction engine and have arrived at the machining of the eccentric straps.
Wenford A 7¼ Inch Gauge 2-4-0 Beattie Well Tank
The stage has now been reached where the well tank body can be completed but beforehand there are some internal details to add.
Vertical Boiler Locomotives
Vertical Boiler Locomotives
Union Nuts, and How to Make Them
These are quite different from those commercially available and are made from copper
SHOWCASE Paul's Engine
One day my son Paul came to me and asked if we could make something in my workshop, so that he could learn engineering processes.
CLUB NEWS
My secret’s out!

Building Dancer - The Boiler
Dancer needed a boiler that would be somewhat larger than the size permitted under the Model Engineering exemptions in the New Zealand regulations.
An Inverted ‘Ross Yoke' Watercooled Stirling Engine
As with all my hot air engines they are cheap to build, mostly from scrap
A Draught Proposal
A Draught Proposal
A Boiler Feed Pump
A Boiler Feed Pump