
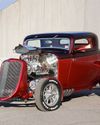
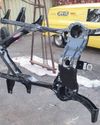
The previous tech article on the disc brake adaption for the Model A bucket re-creation project also detailed the work involved in fitting steering arms that would clear the Gary Page dropped I-beam axle. Essentially I used forged steering arms that are designed to fit down under the lower boss on the stub axles, the only way I could successfully achieve clearance between steering arm and dropped axle end as the steering is turned through its full arc of operation. Even then I had to have the tapers for the tie rod ends reversed to position the tie-rod above the steering arms rather than below, in order to clear the hairpin radius rods. That also meant a change to the height of the front spring perch, but as described in that previous article it all works now.
Having solved those clearance mysteries, it is time to move on with the rest of the steering system for the Model A bucket. The forged steering arms that I used are only available in left-hand drive versions so the extra tie-rod end hole was on the wrong side for our RHD requirements. The extra hole was cut off the right side steering arm and I used a double-eye tie-rod end on the left side to gain the required outer mounting position for a cross-steer drag link. That means a slightly shorter drag link tube that will compensate for the longer double-eye tie-rod end.
This story is from the December 2020 edition of Australian Street Rodding.
Start your 7-day Magzter GOLD free trial to access thousands of curated premium stories, and 8,500+ magazines and newspapers.
Already a subscriber ? Sign In
This story is from the December 2020 edition of Australian Street Rodding.
Start your 7-day Magzter GOLD free trial to access thousands of curated premium stories, and 8,500+ magazines and newspapers.
Already a subscriber? Sign In
Built To Boogie
Joe Pega’s full size Hot Wheels coupe was...
How-To Paint The Caddy Chassis
Preparing and painting a chassis at home
NITRO METHANE
Shaun and Tracey Pask’s wicked ’33 Willys gasser...
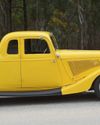
Searle's Street Rod Tudor
Alan’s A Model is home built hot rodding at its best...
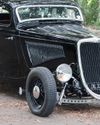
LIL' BLACK DELUXE
ANDREW SCRIM'S 1934 FORD FIVE WINDOW COUPE IS A HOT ROD WITH A RICH HISTORY...
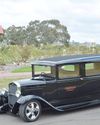
The Hot Rod Hearse
Oakdale Funerals team up with Detroit Chassis to deliver a classy Model A worthy of any hot rodders final ride...
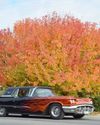
1960 FLAME BIRD
THIS MILD CUSTOM THUNDERBIRD MADE ITS WAY TO CENTRAL VICTORIA FROM CALIFORNIA...
Technical Workshop
The column wherein all your questions relating to the technical aspects of hot rodding can be answered by our technical consultant, Ted Robinette. write to: p.o. box 232, Castlemaine 3450. email: info@graffitipub.com.au
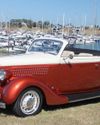
Hallett's '35 Convertible
Pieced together over a six year period using bits from a sedan and a coupe...
Sainty's Aussie Street Rod
Greg and Karen’s coupe has been on the road for 39 years...