
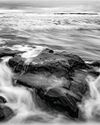
Sharpening tools are essential in photo-editing, but it’s easy to get confused over which tools to use, when to sharpen, and how much sharpening to apply. To get this right, it can be helpful to think of sharpening as part of a wider workflow, as I’ll show here.
We’ll perform initial sharpening and noise reduction in Lightroom and take the image into Photoshop for a little retouching to remove the distracting leaf, then roundtrip back to Lightroom for final sharpening. Our workflow involves two distinct sharpening stages: one at the beginning, the other at the end.
The first stage is called the capture sharpening. This involves general sharpening to correct for inherent softness in an image, or to crisp up details. It’s best done in Lightroom’s Detail Panel (or in the same panel in Camera Raw). Capture sharpening can sometimes amplify image noise, especially in high-ISO images. This is also a good time to apply noise reduction if the image needs it. We’ll do it here with the help of the Adjustment Brush, which lets us paint in noise reduction to specific areas.
This story is from the June 2020 edition of Digital Camera World.
Start your 7-day Magzter GOLD free trial to access thousands of curated premium stories, and 8,500+ magazines and newspapers.
Already a subscriber ? Sign In
This story is from the June 2020 edition of Digital Camera World.
Start your 7-day Magzter GOLD free trial to access thousands of curated premium stories, and 8,500+ magazines and newspapers.
Already a subscriber? Sign In

Jess McGovern
The multi-award winning photographer will speak twice at The Photography Show this month. Niall Hampton finds out what's in store...

Viltrox AF 27mm F1.2 Pro
A ‘pro’ lens with a consumer price tag

Lumix S100mm f/2.8 Macro
Ticks many boxes but is not a total success

Canon RF 200-800mm F6.3-9 IS USM
Every so often, a new superzoom telephoto lens grabs our attention.

Hasselblad 907X & CFV 100C
Not just a beautiful camera system but versatile, too

Sam Davis
The caving photographer will be shining a light on his passion at The Photography Show. Niall Hampton gets a deep dive into the subject

Explore the Multiply blending mode
Multiply is a versatile mode that can be used for a wide range of effects, either on its own or combined with other modes
Create a fine-art border in Lightroom
Enhance your landscape photos by adding a fine-art border with an even feathered edge

Content Credentials explained
Fight the fakes and prove your own photos are genuine with provenance tools in Photoshop and Lightroom
Scanning ahead...
With ever-higher sensor resolutions, Jon Devo asks whether zoom lenses have had their day